Independent knowledge base software guide Evidence-led Updated 2026

Notion Knowledge Base: How to Build, Share, and Maintain One
A Notion knowledge base is a collection of help articles, procedures, and reference pages organized inside Notion. You can build it with ordinary pages, a database, or Notion’s native wiki features. For an internal team library, a wiki is a useful starting point because it combines readable pages with ownership and content-maintenance tools. For customer-facing documentation, Notion Sites provides a separate publishing route.
The most important decision comes before the layout: who should be able to read and change the information? Build around that audience, then add navigation, useful articles, and a review process. Notion’s knowledge management features provide the building blocks, but your structure and permissions determine how the finished library works.
Choose the structure before choosing a template
Not every collection of Notion pages needs the same setup. Choose the simplest structure that supports the way people will find and maintain the information.
| Structure | A useful starting point for | What to plan for |
|---|---|---|
| Pages and subpages | A personal reference library, short handbook, or small public FAQ | Organize navigation and track responsibility yourself. |
| Native wiki | An internal team knowledge base with identifiable article owners | Use its page-oriented home alongside structured views and verification. |
| Article database | A collection that needs consistent properties, filtered views, and reusable article formats | Design the properties and access rules around your workflow. |
A Notion database is not just a spreadsheet: each database item is a page that can contain the article itself. Properties describe those pages, while views provide different ways to browse the collection.
For a support team documenting onboarding and recurring procedures, start with a native wiki. For a personal collection with little need for ownership tracking, ordinary pages may be enough. A teamspace organizes an area of the workspace; it is not itself an article format or a substitute for checking permissions.
Pick a template that matches the audience
The Notion knowledge base template category contains both Notion-created and community-created options. Check the creator, price, structure, and dependencies rather than assuming every Marketplace listing is an official Notion template.
Two Notion-created starting points are the Product Wiki template for team documentation and the Help Center template for customer-facing information. Choose by the work you need to support, not by the number of dashboards included.
Before adopting a template, inspect one article and its parent page. Can you understand where content belongs? Can a colleague update it without deciphering formulas or unnecessary databases? Remove sample material and test sharing before adding real company information. A template’s appearance is not evidence that its access settings match your needs.
How to build an internal Notion knowledge base
The following example uses a hypothetical software support team. Its internal library will contain onboarding instructions, troubleshooting procedures, and guidance for maintaining documentation. Customer-facing articles will live under a separate public home.
1. Create a starting page with a clear purpose
Create a blank page named Support Knowledge Base. Notion’s page creation guide explains the new-page control in the sidebar. For a new, unshared draft, start in the sidebar’s Private section rather than placing unfinished content in a broadly shared location.
Add a short purpose statement: “Internal procedures for support onboarding, issue handling, and documentation maintenance.” This tells contributors what belongs here. Keep customer records, credentials, and unrelated meeting notes out of this starter library.
Choose a small set of recurring questions to answer first. For example: How does a new agent get started? What information is needed before escalating a bug? How should an outdated article be corrected? These questions give the structure a practical purpose before you invest in formatting.
2. Convert the page into a native wiki
On a standalone page where you have Full access, open ••• → More → Turn into wiki. Notion’s wiki documentation distinguishes this from an ordinary database: an existing database cannot be converted directly into a wiki.
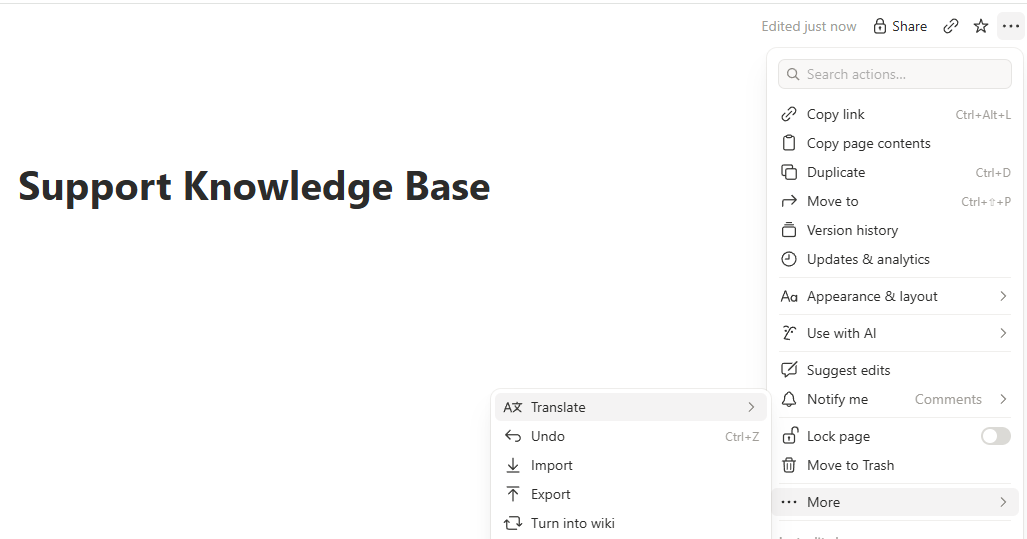
The wiki provides three default views: Home for the page-based landing area, All pages for the collection, and Pages I own for the current person’s assigned pages.
If the conversion option is missing, check the page type and your access level first. Do not rebuild the entire library or change plans before confirming that you are working on an eligible standalone page rather than a database or a database item.
3. Build navigation around tasks
Use the Home view as a starting point for readers, not a display of every possible property. For this example, organize article links under three headings:
- Start here: Support onboarding checklist; Tools and access.
- Handle customer issues: Triage a new request; Escalate a reproducible bug.
- Maintain the library: Update an article; Report missing documentation.
Create an article inside the home page with the /page command, then give it a task-specific title. Notion’s subpage instructions cover this action and the resulting navigation. Place the article link under the relevant heading.
A title such as Escalate a reproducible bug gives readers a clearer destination than Support process 3. Keep the first version shallow enough that someone can understand the available topics without opening several layers of category pages.

4. Write one complete answer before importing everything
Each article should help someone complete a task or make a decision. A useful format includes when to use the instructions, what is needed beforehand, the procedure, the expected result, and what to do when the procedure does not apply.
Here is a short, fictional example that demonstrates the format without depending on a particular ticketing product:
Escalate a reproducible bug
Use this when: A support agent can repeat an unexpected product behavior using non-sensitive test data.
Before starting: Record the affected feature, environment, and expected behavior. Remove customer information from screenshots and examples.
Procedure: Write the reproduction steps, check for an existing issue, and send the evidence to the designated escalation owner. Link the support request to the issue so the next person can follow the history.
Expected result: The escalation has an owner, enough information to reproduce the behavior, and a link back to the original request.
When it does not apply: If the behavior cannot be reproduced, record what was tested and ask the escalation owner what evidence is needed next.
Adapt that pattern to your actual process. Avoid adding sections that every author will leave empty. Test the article with a colleague before applying its format to the rest of the library.
For an ordinary article database, you can save a repeatable format through the dropdown beside New → New template. Notion’s database templates can carry both page content and property values. That is a reusable database-page format, not a requirement to replace the wiki setup above.
5. Add ownership and only the metadata you will use
Assign responsibility for each article to someone who can confirm the procedure and arrange corrections. Notion’s team wiki guide describes ownership, tags, verification, and additional properties.
For the sample library, use the existing ownership and tagging controls, then consider adding Last reviewed and Next review as Date properties. These are suggested fields you create, not automatic records of a substantive review.
A manually created Writing stage property can help authors track work, but a value such as “Draft,” “Approved,” or “Private” does not publish, approve, or secure a page. Treat it as an editorial label. Similarly, a recent edit does not necessarily mean that someone checked the instructions for accuracy.
Set permissions and test as the intended reader
Open Share, select the people or groups who need access, choose their permission level, and send the invitation. Use Can view for readers, Can comment for feedback, and editing access for maintainers. Reserve Full access for people who should also manage sharing. These levels are defined in Notion’s sharing and permissions guide.
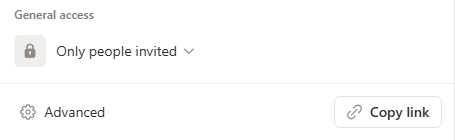
Check existing access before assuming a new restriction works. Subpages inherit parent permissions, and Notion honors the broadest access a person has. A narrow invitation does not cancel a broader workspace or teamspace grant.
Teamspaces have their own membership settings; private teamspaces are a Business and Enterprise capability. Review the teamspace documentation before using one as the home for restricted procedures.
A filtered view is not a security boundary. Hiding an article from a view, hiding a property, or locking a layout is not the same as denying access. Business and Enterprise offer database page-level access rules, but those rules must be configured deliberately and checked against broader permissions.
Before inviting the whole team, run three practical checks:
- Reader check: Have an intended reader open the home page, follow an article link, and confirm that editing is unavailable when it should be.
- Contributor check: Have a maintainer make a harmless correction to a test article and confirm that the expected editing controls are available.
- Restricted-access check: Use a test account outside the permitted audience to open a direct link to restricted content. The account should not be able to read it.
For an external collaborator, distinguish an invited guest from a workspace member. A guest needs a Notion account to use privately shared pages. Notion explains these roles in its workspace user guide. Do not make an internal page public merely because an invitation fails.
Make articles easy to find
Test navigation and search separately. Ask a teammate to find the sample escalation procedure without sending its direct link. If they cannot identify the right section, revise the home page labels. If they find several competing answers, consolidate the articles or make their scope explicit.
For workspace search, select Search in the sidebar or use Ctrl/Cmd + P. Search for the article title and then a phrase from its body. The In filter can narrow results to a selected page and its subpages. These controls are covered in Notion’s search documentation.
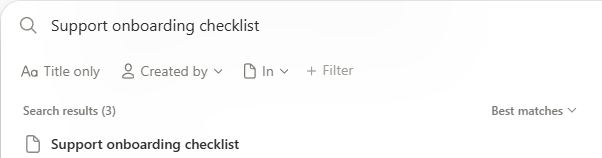
There is an important difference between search boxes: database search checks page titles and property values, not the article body. Workspace search can find content inside database pages. A failed database search therefore does not necessarily mean that the article is missing.
Use the terms your team actually uses in titles and opening sentences. Keep the answer in the article itself rather than leaving essential instructions only in comments. Test with a new reader’s vocabulary, not just the exact title the author remembers.
Keep pages current with owners and verification
Ownership answers “Who should check this?” Verification indicates that an owner has marked the page as current. Neither replaces reviewing the actual instructions.
For a wiki page you own, open its Verification control and choose an expiration period or indefinite verification. Expiration prompts the owner to revisit the content. The wiki maintenance guide explains this workflow.
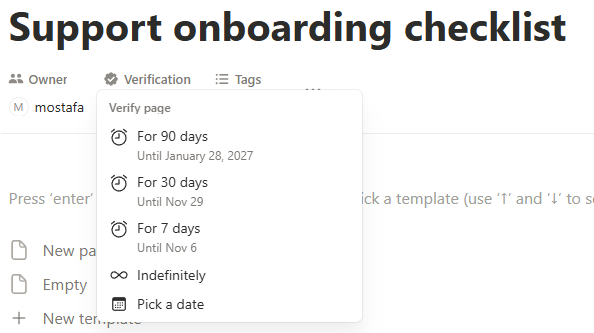
For procedures affected by product or policy changes, use a review period that reflects how quickly they become outdated. Also trigger a review when the process changes, a teammate reports an error, or the responsible owner moves to another role. Do not wait for a scheduled date when you already know an article is wrong.
Verification outside a wiki has different availability: Notion documents individual-page and ordinary-database verification on Business and Enterprise. Check the relevant section of its verified-pages documentation rather than assuming every page type has identical controls.
When a verification feature is unavailable, use an explicit owner and manually maintained review dates. A review view should make neglected articles easy to identify. Before retiring a page, check which other articles link to it and direct readers to the replacement so the library does not accumulate competing instructions.
Publish a public knowledge base with Notion Sites
For customer documentation, create a separate Help Center home containing only material intended for public reading. Notion’s help-center guide demonstrates organizing articles as subpages and publishing the collection.
Keep internal escalation instructions outside this public structure. Separating the collections makes it easier to inspect what you are releasing, although you must still check permissions and links.
According to Notion’s publishing documentation, subpages are published by default, and public-page metadata can include contributor names, profile photos, and email addresses. Review both the content and the people associated with it before publication.
- Prepare the public home. Add descriptive topic headings, article links, and a clear route for readers who still need help. Remove sample pages and internal references.
- Publish the intended page. Open Share → Publish and select Publish.
- Copy the visitor-facing URL. Use View site to open the published version rather than sharing an editor URL.
- Test without signing in. Open that URL in a signed-out browser session. Follow article links, check mobile readability, and confirm that internal content is inaccessible.
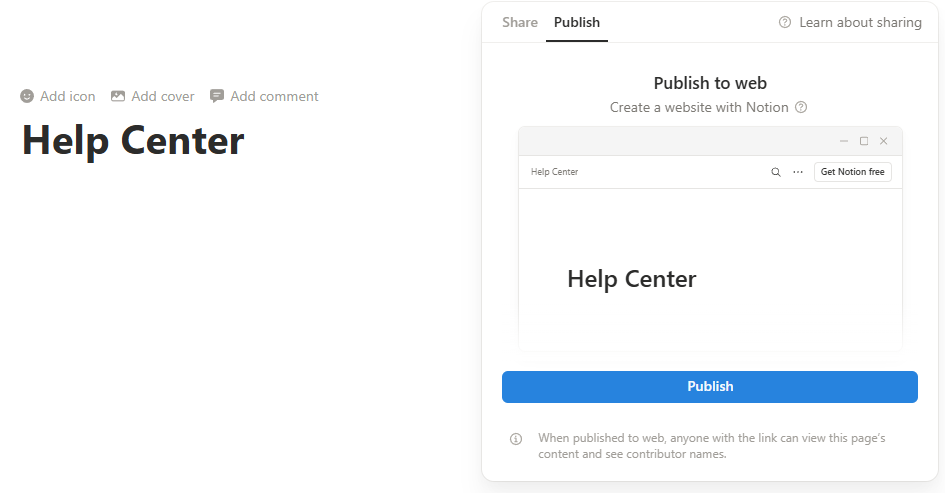
Public visitors can read the published site without a Notion account. Changes to a published page update the live site automatically, so prepare substantial revisions elsewhere until they are ready.
Paid plans provide site customization, including navigation and a visitor search control. In Share → Publish → Site customization → Header, you can configure the Search option. Test this public search separately from workspace search; it is a different reader experience.
Publishing and public-link sharing are separate controls. When taking content offline, unpublish the Site and also remove any Anyone on the web with link access that should no longer exist. Disabling search-engine indexing is not a substitute for restricting access.
Use Notion AI as a retrieval layer, not a replacement for the articles
Notion’s Enterprise Search can answer questions using workspace content and connected sources. It is available on Business and Enterprise. Its default scope can include the workspace, connected applications, and the web, so an answer is not necessarily based only on your knowledge base.
For an internal procedure, use the source controls to select the relevant workspace or page. A useful test question for the example library is: “What information should I collect before escalating a reproducible bug? Use the Support Knowledge Base and cite the article.” Open the cited page and check whether it actually supports the answer.
Notion states that its AI honors existing permissions. That does not repair overly broad access: information already shared with the wrong audience still needs its permissions corrected.
Free and Plus include limited complimentary AI responses rather than the same ongoing AI access as Business and Enterprise. Some higher-consumption models also require credits, as explained in the Notion AI FAQ. Keep AI usage costs separate from the basic knowledge base setup.
Treat workspace AI and a customer-facing support chatbot as different requirements. Publishing a Notion Site should not be taken as evidence that anonymous visitors receive your workspace’s AI search experience.
What can you do for free, and when do you need an upgrade?
You can start a basic Notion knowledge base on the Free plan. For an individual workspace, pages and blocks are unlimited; a Free workspace with multiple members is subject to a 1,000-block limit. These are content blocks, not 1,000 complete articles. Notion’s block-usage documentation explains the distinction.
Choose an upgrade around a requirement you have identified, rather than assuming that all knowledge base features require the same subscription.
| Requirement | Plan or capability to evaluate | Decision point |
|---|---|---|
| A personal library or basic public documentation | Free | Check collaboration limits before expanding the workspace. |
| Ongoing team collaboration beyond the Free block allowance | Plus or higher | Budget for workspace members, not the number of articles. |
| Public-site customization and Google Analytics integration | A paid plan | Decide whether the additional presentation and reporting controls are necessary. |
| Verification outside wikis, database page-level access rules, or Enterprise Search | Business or Enterprise | Confirm which of these capabilities your workflow actually needs. |
| A custom domain for Notion Sites | A paid plan plus the custom-domain add-on | Treat the domain add-on as an additional charge, not an included workspace seat feature. |
The Notion Sites plan guide confirms that Free includes public Sites and a notion.site domain, while customization, analytics integration, and the optional custom-domain add-on have additional requirements. A third-party publisher is therefore not automatically necessary just to publish articles or use a custom domain.
For subscription rates, use the official pricing page, select USD, and compare the billing intervals. Paid workspace plans are billed per member. Guests are a different access category, with plan-specific limits; anonymous public readers should not be confused with paid workspace seats. Keep template purchases, domain add-ons, and optional AI consumption separate when estimating the total.
When a dedicated help center may be a better fit
Choose Notion when flexible documentation and collaborative maintenance are the main job, particularly when the team already works there. A small public help library can also be a reasonable fit after you have tested its navigation, search, and publishing behavior.
Evaluate a dedicated help-center product when the requirements extend beyond maintaining pages: coordinated multilingual releases, formal approval before publication, article-helpfulness reporting, failed-search analysis, authenticated customer access, or a connected support escalation workflow.
For each requirement, classify the proposed solution as native Notion functionality, a manual process, a paid add-on, or a third-party integration. Then test the complete reader journey rather than comparing feature names. Site traffic reporting, for example, does not by itself demonstrate that readers found an answer or avoided opening a support request.
Keep internal and external tools separate when their audiences require different experiences. A maintainable team wiki and a customer help center do not have to use the same publishing system.
Notion documentation and feature availability checked on October 30, 2026.